
Question: When we upgraded from version 2017 Payroll to version 2018 Sage 100cloud the Payroll did not automatically convert. How to we get the new Payroll Form to work and fit our old preprinted check stock?
NOTE: We advise that you consult with your certified Sage 100 ERP consultant before making any changes to your Sage 100 system. If you don’t currently work with a Sage 100 consultant, contact us, call 760-618-1395 or email us at mike.renner@wacptrs.com and we are available to help.
Answer: First of all the change from version 2017 Payroll Sage 100cloud to version 2018 Payroll Sage 100cloud was not only a completely new Payroll database and rewrite but also a change from Crystal version 2011 to Crystal version 2016. This blog is a basic explanation of how the new Payroll form works and what to do. Note: Sage Support does not officially support modified Crystal Forms and we have always consider knowledge of Crystal Forms modification to be tribal knowledge of some sort. There is always formal Crystal Reports training available from different sources, you have to know your way around basic Crystal Reports but much of what is learned is obtained from someone else that might give you pointers of what to do. This is my attempt to explain.
- So the Payroll Form changed from version 2017 in that it had a top and bottom stub and each of the stubs could be separately edited and moved. To now in version 2018 it is just one stub that is used, the problem is to figure out how to move each of the two stubs. So my example is a Stub, Check, Stub.
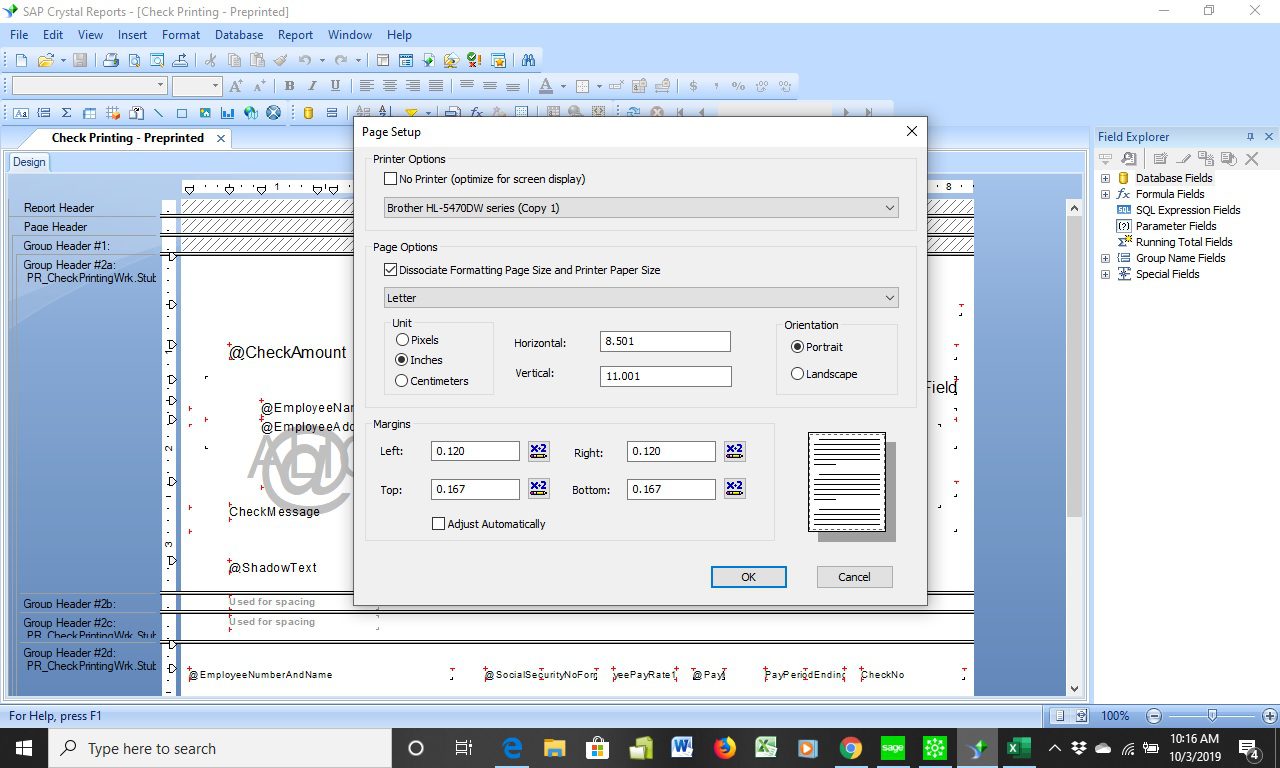
- For the Top Stub to move it up or down you need the use the Top Margin on the Crystal Report. This is found by clicking File>Page Setup and you can see below that the Top Margin defaults to .167 inches. You can move the form up by decreasing the Top Margin and move it down by increasing. You can change the setting, print to a sample check stub until it fits your form.

- Another issue we ran into when we started adjusting the Top Margin is the form started printing 2 pages, to get rid of the 2 page print we had to adjust down the Bottom Margin.
- So, once we get the Top Stub positioned what about the Bottom Stub? So see picture below, you hover over the line Group Header #2b (Red Circle) and just drag it down, this will adjust down the bottom stub and again decrease the Bottom Margin if it starts printing two pages.
- Some of this re-positioning of the stubs is going to mess up the location of the fields on the check. For the check just drag and drop the fields into the right location. You can then print until all is correct and save the form.
- How do I find out more information? You can contact us via our Contact Form, call us at 760-618-1395 or email at mike.renner@wacptrs.com.Written by Mike Renner: WAC Solution Partners are dedicated to offering business solutions like Sage 100 (formally MAS 90) with over 25 years in the accounting software industry.Mike is also a Sage Certified Trainer and a recognized leader in the design, implementation and support of ERP systems, including Sage. Specialties: Sage 100 (formerly MAS90), Acumatica, QuickBooks Pro Advisor.

