Question: We are a Sage 100 2016 user, how can we install Workstation setup on one of our networked computers?
Answer: First of all on the server that the Sage 100 2016 program is installed you will need to do a Share of the folder above the MAS90 folder. Example parent folder of the MAS90 folder might be called Sage 2016. You will want to right click on that folder, share it and give full permissions for the users that will be accessing Sage 100.
You will then log onto the Workstation that you will be running Sage 100 on and do a mapped drive to the parent folder, such as M:\\Server1\Sage 2016 which should then give you access to the folder. You will want to click down to the MAS90\wksetup folder and then run the Setup.exe program as an Administrator by right clicking on the program icon.

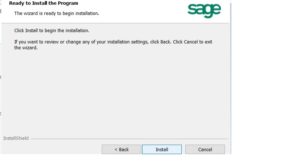
The program will run on the screen as shown below:

You will click the Next button:

Click the next button to run as Complete:

Click the Install button:

You will next want to install the Wks Update Standard, right click and install as Administrator, and follow installation until finished:


Once the program finishes you can find the new Sage 2016 icon in the Program files and can copy to the Computer Desktop:

If you have questions please contact us at www.caserv.com or 760-618-1395. Please stay tuned for more helpful Sage 100 ERP tips!
